


As you may have seen on Instagram, last week I set up a window display at a popular hotel here in Edmonton. It's part of an amazing project called Green Window City, which invited artists to pair up with businesses in a busy shopping and restaurant district. The goal of the project is to reclaim otherwise wasted materials to make art, and to celebrate Pride Week here in Edmonton. Nineteen installations went up last week, and I feel so lucky to have made one of them.
I was so excited when I got an email asking me to be a part of this project. I did some set designs while studying theatre in university, and for awhile thought I would pursue it as a career. I didn't, and while I've been loving my dedication to small-scale artwork, I've been feeling a big of a longing to work on a large scale again. This project was exactly the opportunity I'd been hoping for.

I knew I wanted to use my trip to Turkey and the Middle East as inspiration, since travel often leads to some of my best ideas. I didn't do any active work on the project while I was away - I was way too busy exploring! - but did have a flash of insight one night. In Istanbul we had seen a man pushing a cart full of daisies that he would separate into bouquets to sell to people. On those same Turkish streets we saw fruit juice vendors with extravagant piles of pomegranates and oranges, and in Cairo, too, we saw vendors with strings of fruit hanging from the ceiling. The abundance of colour and shape really struck me and it felt like a good theme to go with to celebrate Pride, which always seems to me like an abundant celebration of life, love, joy, and colour.
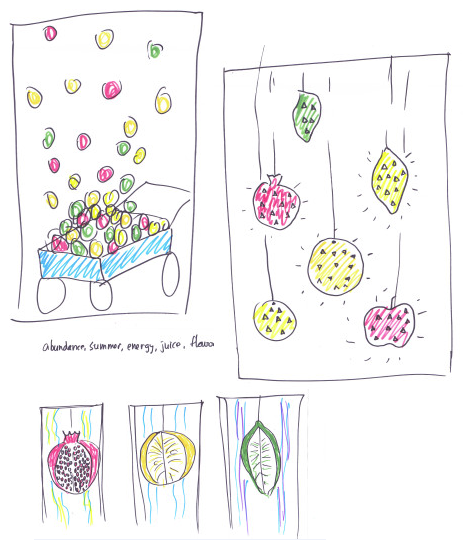
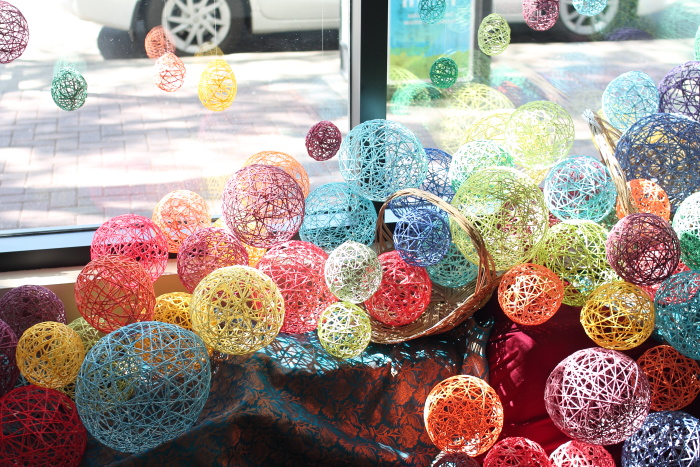
Once I had an idea, I needed to figure out how to make it. I did some sketches, and made a Pinterest board, but wasn't falling in love with any of my ideas. I started thinking about the beautiful metal lanterns that we saw in Cairo, and wondering if I could mix fruit and lanterns. When I searched 'diy lanterns' on Pinterest I found these and I was done. I decided to make dozens and dozens of string balls in all different colours. While I loved the idea of a cart like this one, I found some gorgeous baskets at the Re-Use Centre - a magical place where people drop off unwanted craft, office, and home decor supplies and where you can take home as much as you want for $5 - and decided they would work great.

Obviously I needed a lot of yarn, but it wasn't hard to find. Some was leftover from other projects, some was from the Re-Use Centre, some from Goodwill, and some was donated by a local business that wants to use some of the finished balls in their window - a good trade! We have a pretty good fabric stash at home so I just raided that to cover the structure.

The balls are super easy to make:
- Make a basic paper mache glue with flower and water - you want it to be thin but not too runny.
- Blow up a balloon.
- Rub Vaseline all over it.
- Mush some yarn in the glue so it's soaked, then squeeze the excess off (this part is really important - if you leave too much glue on the yarn it will still look white and goopy when it dries).
- Wrap it around the balloon, making sure to go in every direction, filling in all the big spaces. This can take some practice to make it work. I found that pulling the yarn tight as I went helped keep it from sliding off the balloon.
- Let it dry for 24 hours.
- Gently snip the end of the balloon near the tie so it deflates slowly and pull it out. (The balloon makes the best sounds when it's deflating and pulling away from the yarn.)
- Knock off any leftover pieces of glue (the Vaseline makes this step mostly unnecessary).

The flour mixture mutes the colour of the yarn a bit, but as you can see in the pictures, it's not really obvious once they're dry. I recruited some crafty friends to help me make these, since I knew I wouldn't be able to get the volume I wanted on my own. I had two crafting parties, and one friend even worked on them at home when she couldn't make it (thanks Anna!). When working alone I put on Gilmore Girls and wrapped yarn for hours on end. I was actually a little sad when I ran out of time and had to stop making them - it's a very relaxing activity.

Soon my living room was overflowing with colour. I'm sure my boyfriend was very eager for the display to go up so he could get his space back.

Last Friday I packed them gingerly in the truck to bring them over to the hotel where thankfully I had another set of hands to help (thanks Dhana!). Since window displays are not a common occurrence at the hotel (unlike a lot of the retail windows that were used), there wasn't anything there for me to hang the balls from. Thankfully, Pinterest saved the day again by reminding me about 3M Command hooks. They stuck to the window frame really easily, and since the balls weigh next to nothing I was able to hang 3 - 6 from each hook, using fishing line.

The rest of the balls got piled up below the window, using boxes and bins to prop them up under the fabric. In the end I wished I had more - the pile wasn't quite as high as I would have liked - but I was still happy with it.

I was also happy with the fact that I barely felt any anxiety over this project. I told myself right at the beginning that this was going to be fun and that I wouldn't get stressed out. For the most part it worked! I really enjoyed the process and hope I can participate next year and come up with something completely different!

If you live in Edmonton there are still a couple days left for you to see the display in person - I'm taking it down Friday morning. The rest of the displays will be up until Sunday though, so go have a look!